

Showing posts with label Snacks. Show all posts
Showing posts with label Snacks. Show all posts
Monday, March 16, 2015
Ginger Pear and Apple Chips
These baked pear and apple chips are a fun, healthy, and delicious snack, perfect for the whole family!
Wednesday, January 28, 2015
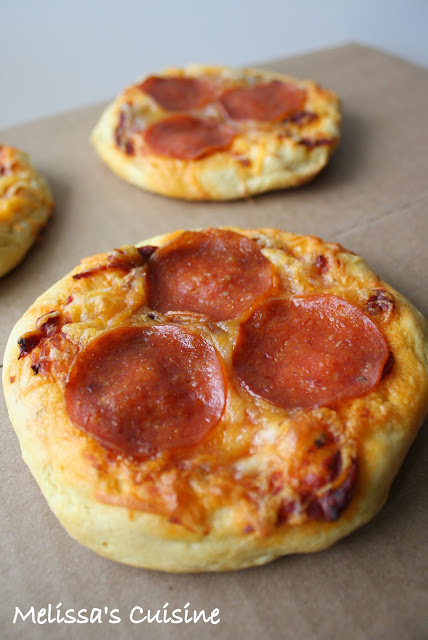
Stuffed Bubble Pizza
This bubble pizza is stuffed with pepperoni and mozzarella and baked in a cast iron skillet for a fun pull-apart dinner. It's a kid and adult pleaser and the perfect Superbowl snack!

Monday, December 22, 2014
Caramel Corn
This sweet and crunchy Caramel Corn is delicious treat and makes a fun homemade Christmas gift!
 Christmas is only 3 days away--is anyone else in shock? It's finally starting to feel like Christmas since we had our first family Christmas party in Canada on Saturday. We had a great time with our family and Summer loved seeing everyone!
Now we are back home and it's crunch time! I have about half my gifts left to wrap and I still have some baking to do so I can bring some treats over to our neighbors. Since I'm a little short on time I'll be making something quick and easy. The recipe topping that list is my dad's Caramel Corn recipe. I made a batch last week for my co-workers. I filled little ramkins with the treat and packaged it up in a clear cellophane bag with a pretty bow. My co-workers loved it!
 This caramel corn is a recipe I grew up making. My dad always made it in the microwave and my brother and I loved helping him pour it into a brown paper bag and then stir it up. As kids we couldn't believe the magic that happened in the microwave ;) You can make this recipe in the oven too if that's more your thing, I just choose to use the microwave because it's faster! Either way, the caramel corn tastes amazing!
 Caramel Corn
Makes 24 1 cup servings
Ingredients:
1 cup butter
2 cups brown sugar
1/2 cup corn syrup
1 teaspoon salt
1/2 teaspoon baking soda
1 teaspoon vanilla
6 quarts popped popcorn
1. Melt the butter in a large saucepan.
2. Add the brown sugar, corn syrup, and salt and bring to a boil, stirring constantly.
3. Allow the mixture to boil for 5 minutes without stirring.
4. Remove the caramel from the heat and stir in the vanilla and baking soda. It will expand when you add the baking soda, so be sure to use a large pan!
5. Microwave directions: Coat the inside of a brown grocery bag with cooking spray. Pour the popcorn into the bag and pour the caramel over the popcorn. Stir to coat. Fold the bag over and microwave for 2 minutes, then remove the bag from the microwave and stir. Microwave another 2 minutes and stir, then an additional 2 minutes and stir. Spread caramel corn on a baking sheet to cool.
6. Oven directions: Place the popcorn in a large bowl and pour the caramel over it. Stir to coat. Spread on two cookie sheets and bake at 250 for 1 hour, stirring every 15 minutes. Remove from the oven and cool.
When the caramel corn is cool, break it apart and store in an airtight container.
Now we are back home and it's crunch time! I have about half my gifts left to wrap and I still have some baking to do so I can bring some treats over to our neighbors. Since I'm a little short on time I'll be making something quick and easy. The recipe topping that list is my dad's Caramel Corn recipe. I made a batch last week for my co-workers. I filled little ramkins with the treat and packaged it up in a clear cellophane bag with a pretty bow. My co-workers loved it!
Makes 24 1 cup servings
Ingredients:
1 cup butter
2 cups brown sugar
1/2 cup corn syrup
1 teaspoon salt
1/2 teaspoon baking soda
1 teaspoon vanilla
6 quarts popped popcorn
1. Melt the butter in a large saucepan.
2. Add the brown sugar, corn syrup, and salt and bring to a boil, stirring constantly.
3. Allow the mixture to boil for 5 minutes without stirring.
4. Remove the caramel from the heat and stir in the vanilla and baking soda. It will expand when you add the baking soda, so be sure to use a large pan!
5. Microwave directions: Coat the inside of a brown grocery bag with cooking spray. Pour the popcorn into the bag and pour the caramel over the popcorn. Stir to coat. Fold the bag over and microwave for 2 minutes, then remove the bag from the microwave and stir. Microwave another 2 minutes and stir, then an additional 2 minutes and stir. Spread caramel corn on a baking sheet to cool.
6. Oven directions: Place the popcorn in a large bowl and pour the caramel over it. Stir to coat. Spread on two cookie sheets and bake at 250 for 1 hour, stirring every 15 minutes. Remove from the oven and cool.
When the caramel corn is cool, break it apart and store in an airtight container.
Monday, December 15, 2014

Wednesday, October 15, 2014
Slow Cooker Apple Snack Mix
A fall-inspired snack mix filled with bite sized cinnamon sugar coated snacks and drizzled with white chocolate.

Friday, September 19, 2014

Monday, September 15, 2014
Zucchini Chocolate Chip Cookies

Monday, August 11, 2014
Watermelon Popsicles
Refreshing, delicious, and healthy too! These Watermelon Popsicles are the perfect summer treat!

Wednesday, July 09, 2014
Pioneer Woman's Cinnamon Rolls
Fluffy, sweet, decadent, divine...all perfect adjectives to describe these delicious cinnamon rolls!
 Is there every a wrong time for a cinnamon roll? They can be eaten for breakfast, lunch, dinner, or snack! Or ever a wrong occasion? I used to think that homemade cinnamon rolls were only for special occasions--Christmas morning, Mother's Day, my birthday...but now I've decided that any day is good for cinnamon rolls!
 I've made these cinnamon rolls dozens of times. They're my go-to recipe and they always turn out delicious! The cinnamon rolls are light and fluffy, but it's really the icing that puts them over the top. I drizzle it on while the rolls are still warm and the bread soaks up the icing like a sponge. The cinnamon rolls become gooey and absolutely divine! They're best warm from the oven, but you could always re-heat in the microwave for a special snack.
Don't let the thought of baking with yeast scare you away from these rolls! As long as you are using warm milk, you shouldn't have any problems. This recipe makes a very large batch of cinnamon rolls, so prepare to stock your freezer or give some away. Trust me, your friends will love you!
 Pioneer Woman's Cinnamon Rolls
Makes approximately 5 dozen rolls
Ingredients:
1 quart whole milk
1 cup vegetable oil
1 cup sugar
2 packages yeast (4.5 teaspoons)
9 cups flour, separated
1 heaping teaspoon baking powder
1 scant teaspoon baking soda
1 heaping Tablespoon salt
2 cups melted butter
2 cups sugar
1/4 cup (or more) cinnamon
1 pound powdered sugar
1/4 cup (or more) milk
1 Tablespoon vanilla extract
1. Mix the milk, vegetable oil, and sugar in a large saucepan. Heat until almost boiling (scald), stirring occasionally. Then turn off the heat and let the mixture cool to lukewarm, about 45 minutes.
2. When the mixture is lukewarm (not hot!), add the yeast and stir. Let this sit for 5 minutes.
3. If your pan is large enough, add 8 cups of flour to the milk mixture and stir. If not, transfer the milk mixture to a large bowl first and then add the flour.
4. Cover the dough and let it rise for an hour.
5. After an hour, add the last cup of flour, baking powder, baking soda, and salt to the dough and stir until combined.
6. Sprinkle your rolling surface (counter) generously with flour. Take half the dough and form a rough rectangle. Roll the dough thinly into a large rectangle.
7. Drizzle 1/2 to 1 cup of melted butter over the dough. Sprinkle with 1 cup of sugar, and a generous sprinkling of cinnamon.
8. Starting with the longest side, begin rolling the dough up toward you, jellyroll-style. Pinch the seams to seal it.
9. Drizzle about 1 Tablespoon of melted butter into each pan that you're using. I used a 9x13" pan and then 4-5 7" round disposable cake pans (these are great for freezing and gifting to friends).
10. Use a sharp knife or dental floss to cut the dough into 1" slices. Place cut rolls into greased pans, leaving some space for the rolls to rise.
11. Repeat these steps with the remaining half of the dough.
12. Let the rolls rise for 20-30 minutes, while you preheat the oven to 350.
13. Bake at 350 for 15-18 minutes, until lightly golden brown.
14. While the rolls are baking, make the frosting by beating together the powdered sugar, milk, and vanilla. Add more powdered sugar or milk to reach your desired consistency, it should be thick but pourable.
15. After the rolls have been out of the oven for about 5 minutes, drizzle the icing over them.
Store rolls covered, at room temperature. If you're freezing them, cover them tightly with foil first and then a layer of plastic wrap. Thaw at room temperature before serving; you could also warm them in the oven for a few minutes after they're thawed.
Source: The Pioneer Woman via Melissa's Cuisine (yes, this recipe was previously posted here!)
Don't let the thought of baking with yeast scare you away from these rolls! As long as you are using warm milk, you shouldn't have any problems. This recipe makes a very large batch of cinnamon rolls, so prepare to stock your freezer or give some away. Trust me, your friends will love you!
Makes approximately 5 dozen rolls
Ingredients:
1 quart whole milk
1 cup vegetable oil
1 cup sugar
2 packages yeast (4.5 teaspoons)
9 cups flour, separated
1 heaping teaspoon baking powder
1 scant teaspoon baking soda
1 heaping Tablespoon salt
2 cups melted butter
2 cups sugar
1/4 cup (or more) cinnamon
1 pound powdered sugar
1/4 cup (or more) milk
1 Tablespoon vanilla extract
1. Mix the milk, vegetable oil, and sugar in a large saucepan. Heat until almost boiling (scald), stirring occasionally. Then turn off the heat and let the mixture cool to lukewarm, about 45 minutes.
2. When the mixture is lukewarm (not hot!), add the yeast and stir. Let this sit for 5 minutes.
3. If your pan is large enough, add 8 cups of flour to the milk mixture and stir. If not, transfer the milk mixture to a large bowl first and then add the flour.
4. Cover the dough and let it rise for an hour.
5. After an hour, add the last cup of flour, baking powder, baking soda, and salt to the dough and stir until combined.
6. Sprinkle your rolling surface (counter) generously with flour. Take half the dough and form a rough rectangle. Roll the dough thinly into a large rectangle.
7. Drizzle 1/2 to 1 cup of melted butter over the dough. Sprinkle with 1 cup of sugar, and a generous sprinkling of cinnamon.
8. Starting with the longest side, begin rolling the dough up toward you, jellyroll-style. Pinch the seams to seal it.
9. Drizzle about 1 Tablespoon of melted butter into each pan that you're using. I used a 9x13" pan and then 4-5 7" round disposable cake pans (these are great for freezing and gifting to friends).
10. Use a sharp knife or dental floss to cut the dough into 1" slices. Place cut rolls into greased pans, leaving some space for the rolls to rise.
11. Repeat these steps with the remaining half of the dough.
12. Let the rolls rise for 20-30 minutes, while you preheat the oven to 350.
13. Bake at 350 for 15-18 minutes, until lightly golden brown.
14. While the rolls are baking, make the frosting by beating together the powdered sugar, milk, and vanilla. Add more powdered sugar or milk to reach your desired consistency, it should be thick but pourable.
15. After the rolls have been out of the oven for about 5 minutes, drizzle the icing over them.
Store rolls covered, at room temperature. If you're freezing them, cover them tightly with foil first and then a layer of plastic wrap. Thaw at room temperature before serving; you could also warm them in the oven for a few minutes after they're thawed.
Source: The Pioneer Woman via Melissa's Cuisine (yes, this recipe was previously posted here!)
Tuesday, May 27, 2014
Bacon Parmesan Chickpeas
Crisp and salty Bacon Parmesan Chickpeas are a unique and delicious snack. You won't be able to eat just one!
 How was your Holiday weekend? Were you lucky enough to get a 3 day weekend? Did you spend lots of time with family and friends? I had a busy, but fun, weekend. On Saturday, we took a day trip to Shipshewana. It's a little under a 2 hour drive from our house, so the perfect distance for a day away. We did a lot of shopping and scored a lot of deals. Oh the deals! And the food...the food was amazing! Sunday was our typical Sunday: church and then lunch with my parents. We also got together with our small group, so that was a fun ending to our day. Then Monday was a family/do stuff around the house day. I did a bit of shopping, planted my garden, and did some random projects around the house.
Yes, a busy, but fun weekend indeed!
 When it's so busy, I love to have quick snacks to grab on the go. These Bacon Parmesan Chickpeas are the perfect snack. You can grab a handful on the fly, or put a few in a bowl to enjoy while relaxing. They're fun enough that you could serve them at a party too!
I tried baked chickpeas (also known as garbanzo beans) a while back when some friends were raving about them. To be honest, I wasn't impressed. My chickpeas didn't get crispy, so it was like eating warm chickpeas. Pretty boring if you ask me. I wasn't really interested in trying them again until I saw a recipe on Authentic Suburban Gourmet, my assigned blog for last week's Secret Recipe Club reveal. Since the Bacon Wrapped Pineapple Bites turned out so delicious, I thought I'd give these chickpeas a try.
I'm glad I did! I don't know if it was the bacon, or the Parmesan, or the crisp chickpeas which did it for me, but whatever it was, I've been won over! These chickpeas needed to bake for a long time to get crispy (where I failed last time I made them). A few weren't so crisp, but most of them were and that made all the difference in this snack!
Besides, it has bacon in it. How can you go wrong?!
 Bacon Parmesan Chickpeas
Ingredients:
1 can (15 ounces) chickpeas
2 slices of bacon
salt
Parmesan cheese
1. Drain and rinse chickpeas. Remove any outer skins and discard.
2. Cook bacon until crisp (don't drain the grease!). Remove from pan and crumble.
3. Add the chickpeas to the pan that you cooked the bacon in stir to coat the chickpeas in the bacon drippings.
4. Spread chickpeas onto a cookie sheet. Bake at 400 degrees for 30 minutes, or until chickpeas are crisp.
5. Remove chickpeas from the oven and top with crumbled bacon, salt, and Parmesan cheese.
Serve slightly warm or at room temperature.
If you have leftovers, store them in a covered container in the fridge. I did find that these are best eaten the day they are made.
Source: Authentic Suburban Gourmet
Yes, a busy, but fun weekend indeed!
I tried baked chickpeas (also known as garbanzo beans) a while back when some friends were raving about them. To be honest, I wasn't impressed. My chickpeas didn't get crispy, so it was like eating warm chickpeas. Pretty boring if you ask me. I wasn't really interested in trying them again until I saw a recipe on Authentic Suburban Gourmet, my assigned blog for last week's Secret Recipe Club reveal. Since the Bacon Wrapped Pineapple Bites turned out so delicious, I thought I'd give these chickpeas a try.
I'm glad I did! I don't know if it was the bacon, or the Parmesan, or the crisp chickpeas which did it for me, but whatever it was, I've been won over! These chickpeas needed to bake for a long time to get crispy (where I failed last time I made them). A few weren't so crisp, but most of them were and that made all the difference in this snack!
Besides, it has bacon in it. How can you go wrong?!
Ingredients:
1 can (15 ounces) chickpeas
2 slices of bacon
salt
Parmesan cheese
1. Drain and rinse chickpeas. Remove any outer skins and discard.
2. Cook bacon until crisp (don't drain the grease!). Remove from pan and crumble.
3. Add the chickpeas to the pan that you cooked the bacon in stir to coat the chickpeas in the bacon drippings.
4. Spread chickpeas onto a cookie sheet. Bake at 400 degrees for 30 minutes, or until chickpeas are crisp.
5. Remove chickpeas from the oven and top with crumbled bacon, salt, and Parmesan cheese.
Serve slightly warm or at room temperature.
If you have leftovers, store them in a covered container in the fridge. I did find that these are best eaten the day they are made.
Source: Authentic Suburban Gourmet
Friday, May 02, 2014
Sweet and Salty Peanut Granola Bars
These Sweet and Salty Peanut Granola Bars are a delicious on-the-go snack. They're full of protein to keep you going all morning long!
 What a week! I apologize for the sporadic posts here this week. Our internet has been acting wonky. It works well during the day, but for some reason at night it doesn't seem to work. Of course, I do most of my blog writing at night, and when I can't get on to schedule posts I am stuck! We're working on figuring out a solution: buying a new router or switching internet providers. In the meantime, I'll post as often as I can get the internet to work.
To add to the stress of the week, Summer has been teething and it's causing her to not act like herself. She's incredibly clingy and somewhat irritable. Definitely not my typically happy baby. I can see her right incisor showing through the top of her gum, but it has yet to poke through. In the meantime, I'm giving her lots of teething toys, teething tablets, and plently of cuddles. It's hard to be a baby...
While I'm dealing with all the stressors of life (did I mention my car wouldn't start yesterday morning?), I don't have time or energy to make healthy food choices. I turn to quick freezer meals for lunch, cookies for snack, and fast food for dinner. Since I know that isn't good for me, I'm trying to be intentional about making healthier choices.
One of the ways I've been successful is by creating this homemade version of one of my favorite granola bars. I've been hooked since I bought my first box a few months back and I eat a granola bar every day for my morning snack. One day I decided that I could probably make my own granola bar and it would be healthier and tastier than the one I was buying. I whipped up this batch during nap time (though it was easy enough, I could have done it while Summer was playing) and I was impressed by the taste of them. I haven'te done a calorie comparision between these homemade bars and the storebought ones, but I know the ingredients in these bars are much better for me! Mike and my dad also gave these bars two thumbs up, so I know they're a winner!
 Sweet and Salty Peanut Granola Bars
Makes 1 9x13" pan
Ingredients:
1 cup peanut butter
1/3 cup agave nectar
1 cup peanuts
1 cup oats
2 cups cheerios
3/4 cup peanut butter
3 Tablespoons coconut oil
1. In a large microwave safe bowl, combine the peanut butter and agave nectar. Microwave for 30 seconds to melt peanut butter and then stir until smooth.
2. Add the peanuts, oats, and cheerios and stir until coated.
3. Press mixture into a greased 9x13" pan.
4. In a small microwave safe bowl, combine the peanut butter an coconut oil. Microwave for 30 seconds and then additional 10 second increments until the coconut oil is melted. Stir until smooth.
5. Use a spatula to spread the peanut butter mixture over the bars.
6. Refrigerate until the topping is set, then cut into bars and serve.
Store in an airtight container in the fridge to prevent topping from melting.
To add to the stress of the week, Summer has been teething and it's causing her to not act like herself. She's incredibly clingy and somewhat irritable. Definitely not my typically happy baby. I can see her right incisor showing through the top of her gum, but it has yet to poke through. In the meantime, I'm giving her lots of teething toys, teething tablets, and plently of cuddles. It's hard to be a baby...
While I'm dealing with all the stressors of life (did I mention my car wouldn't start yesterday morning?), I don't have time or energy to make healthy food choices. I turn to quick freezer meals for lunch, cookies for snack, and fast food for dinner. Since I know that isn't good for me, I'm trying to be intentional about making healthier choices.
One of the ways I've been successful is by creating this homemade version of one of my favorite granola bars. I've been hooked since I bought my first box a few months back and I eat a granola bar every day for my morning snack. One day I decided that I could probably make my own granola bar and it would be healthier and tastier than the one I was buying. I whipped up this batch during nap time (though it was easy enough, I could have done it while Summer was playing) and I was impressed by the taste of them. I haven'te done a calorie comparision between these homemade bars and the storebought ones, but I know the ingredients in these bars are much better for me! Mike and my dad also gave these bars two thumbs up, so I know they're a winner!
Makes 1 9x13" pan
Ingredients:
1 cup peanut butter
1/3 cup agave nectar
1 cup peanuts
1 cup oats
2 cups cheerios
3/4 cup peanut butter
3 Tablespoons coconut oil
1. In a large microwave safe bowl, combine the peanut butter and agave nectar. Microwave for 30 seconds to melt peanut butter and then stir until smooth.
2. Add the peanuts, oats, and cheerios and stir until coated.
3. Press mixture into a greased 9x13" pan.
4. In a small microwave safe bowl, combine the peanut butter an coconut oil. Microwave for 30 seconds and then additional 10 second increments until the coconut oil is melted. Stir until smooth.
5. Use a spatula to spread the peanut butter mixture over the bars.
6. Refrigerate until the topping is set, then cut into bars and serve.
Store in an airtight container in the fridge to prevent topping from melting.
Wednesday, April 16, 2014
Skinny Brownies
These skinny brownies have just 3 ingredients and come together quickly! You'd never guess they're actually healthy!
 I love trying new things. As I mentioned a few weeks ago when I did my Avocado: Tips and Tricks post, avocados are a relatively new-to-me fruit. I first purchased a few to try as a first food for Summer. My basic rule of thumb is that if I won't eat it, she doesn't have to. So I had to try a bit of avocado before giving it to her. I've had guacamole in the past but I've never been a big fan of it, so I really wasn't expecting to like avocados. I was pleasantly surprised when I did like them, and I've made a few recipes using avocados since then.
So why am I talking about avocados? Isn't this a brownie post? Well, remember I told you this recipe had only 3 ingredients? One of them is avocado! The other two are water and a box of brownie mix. Does water even count? I love recipes that use a boxed mix because it makes it so easy. (Like these Lemon Crinkle Cookies!)


These brownies are skinny, unless you eat half a pan...
Not that I would know or anything!
Skinny Brownies
Makes 1 9x13" pan, about 12 servings
Ingredients:
2 avocados (about 1 cup of puree)
1/3 cup water
1 boxed brownie mix
1. Remove the flesh from the avocado (directions here) and place in your food processor. Add water and process until smooth. (If you don't have a food processor, you can also use a blender or mash the avocado with a fork.)
2. In a large mixing bowl, combine the avocado and brownie mix. (If your food processor is large enough, you can mix everything in there.)
3. Pour into a greased 9x13" pan.
4. Bake a 350 for 27-30 minutes, until a toothpick inserted in the center of the brownies comes out clean.
Source: JelliBean Journals
So why am I talking about avocados? Isn't this a brownie post? Well, remember I told you this recipe had only 3 ingredients? One of them is avocado! The other two are water and a box of brownie mix. Does water even count? I love recipes that use a boxed mix because it makes it so easy. (Like these Lemon Crinkle Cookies!)
You just take 2 avocados and mash them up really good. I used my food processor to make sure there weren't any chunks. Avocado in brownies is weird enough, but chunks of avocado is brownies, no thank you! Then mix in a bit of water and the brownie mix. And that's it! Pour it into a pan and bake.
These brownies are extremely fudgey! I think their texture is similar to a Lara bar (if you've had one of those before). They're dense and gooey. I opted to store them in the fridge since I wasn't sure how avocado would do sitting out on the counter. I loved eating the brownies cold.
I would consider these brownies to be pretty healthy. The fat from the typical eggs and oil is replaced by good fats from the avocado. A large piece of brownie came out to be just under 200 calories. I figure that's pretty good for such a decadent snack!
These brownies are skinny, unless you eat half a pan...
Not that I would know or anything!
Skinny Brownies
Makes 1 9x13" pan, about 12 servings
Ingredients:
2 avocados (about 1 cup of puree)
1/3 cup water
1 boxed brownie mix
1. Remove the flesh from the avocado (directions here) and place in your food processor. Add water and process until smooth. (If you don't have a food processor, you can also use a blender or mash the avocado with a fork.)
2. In a large mixing bowl, combine the avocado and brownie mix. (If your food processor is large enough, you can mix everything in there.)
3. Pour into a greased 9x13" pan.
4. Bake a 350 for 27-30 minutes, until a toothpick inserted in the center of the brownies comes out clean.
Source: JelliBean Journals
Wednesday, March 19, 2014
Microwave Potato Chips
Did you know that you can make potato chips at home? And there is no frying involved? These microwave potato chips are easy, delicious, and could even be considered healthier!
 I have a huge sweet tooth, and Mike has a savory tooth. Is there such a thing? He loves chips, and could easily devour an entire bag in one sitting if I would let him!
He was totally shocked when he found out that I made potato chips at home!
 This chips are fun and easy to make! They do take a bit of time, and don't produce a large amount of chips, so I wouldn't recommend making them for a party unless you have a lot of time on your hand. However, if you are looking for a single serving snack or a fun after-school or movie night treat, these chips would be perfect!
You'll want to keep a close eye on the chips as you bake them. The first five minutes of baking are pretty simple and you can walk away from the microwave. However, when you get about halfway through the second five minutes, you'll want to stay where you can peek into the microwave. The thickness of your potatoes will play the largest part in determining how long they take to crisp up. Some chips may crisp faster than others. You'll also want to keep an eye on the browning of the chips, you certainly don't want them to burn! After the second five minutes of baking, you'll want to remove any chips that are completely crisp before returning the plate to the microwave.
These chips really are fun to make, and you could add in some spices to flavor them however you want. Dill weed, taco seasoning, garlic salt...the possibilities really could be endless!
 Microwave Potato Chips
Serves 1
Ingredients:
1 potato
baking spray
salt
1. Wash and peel the potato. Thinly slice it.
2. Press the potato slices between two sheets of paper towel to absorb the excess moisture.
3. Place potato slices in a single layer on a microwave safe plate. Lightly spray with baking spray and sprinkle with salt. (You can use olive oil if you have a spritzer.)
4. Microwave potatoes for 5 minutes, then flip.
5. Microwave an additional 5 minutes.
6. Microwave remaining potatoes in 30 second increments until all the chips are crisp. Remove chips from the plate as they become crisp and brown.
Note: As all microwaves vary, you may need more or less time to reach the desired crispness for your chips. Keep a close eye on your potatoes and remove the chips from the microwave as they become crisp.
These chips are best eaten the day they are made, but can be stored in an airtight container.
He was totally shocked when he found out that I made potato chips at home!
You'll want to keep a close eye on the chips as you bake them. The first five minutes of baking are pretty simple and you can walk away from the microwave. However, when you get about halfway through the second five minutes, you'll want to stay where you can peek into the microwave. The thickness of your potatoes will play the largest part in determining how long they take to crisp up. Some chips may crisp faster than others. You'll also want to keep an eye on the browning of the chips, you certainly don't want them to burn! After the second five minutes of baking, you'll want to remove any chips that are completely crisp before returning the plate to the microwave.
These chips really are fun to make, and you could add in some spices to flavor them however you want. Dill weed, taco seasoning, garlic salt...the possibilities really could be endless!
Serves 1
Ingredients:
1 potato
baking spray
salt
1. Wash and peel the potato. Thinly slice it.
2. Press the potato slices between two sheets of paper towel to absorb the excess moisture.
3. Place potato slices in a single layer on a microwave safe plate. Lightly spray with baking spray and sprinkle with salt. (You can use olive oil if you have a spritzer.)
4. Microwave potatoes for 5 minutes, then flip.
5. Microwave an additional 5 minutes.
6. Microwave remaining potatoes in 30 second increments until all the chips are crisp. Remove chips from the plate as they become crisp and brown.
Note: As all microwaves vary, you may need more or less time to reach the desired crispness for your chips. Keep a close eye on your potatoes and remove the chips from the microwave as they become crisp.
These chips are best eaten the day they are made, but can be stored in an airtight container.
Wednesday, March 12, 2014
Biscoff Shakes
A smooth, creamy, and refreshing milkshake! Flavored with Biscoff cookie butter spread, this shake is Mike's favorite snack!

When Mike and I got married, we thoroughly enjoyed registering for gifts. It was the first time either of us lived on our own, so we really were starting from scratch. We were completely blessed with all the gifts we received from our family and friends.
But we were slightly confused that a month after our wedding, our registry was showing that a blender had been purchased, but we couldn't find it in our house. I couldn't remember receiving a blender and it wasn't listed on any of our gift lists we made for thank you cards. We couldn't figure out if we had misplaced the blender, or if the registry was just incorrect. We decided to wait until we needed a blender to buy one.
In December, we were at a family Christmas party and Mike's aunt came up to us with a gift. She said it was a wedding present. We were married in October, and had already received a shower and wedding gift from his aunt, so we certainly weren't expecting anything! We opened up the bag and inside was a blender! It turns out that Mike's aunt had purchased the blender for us, but she attended two weddings in October. When she got our thank you card, she was confused that we thanked her for a set of glasses as she was sure she had given us something "bigger" (her words, not mine!). Then she received a thank you from the other couple, thanking her for the blender. She quickly realized that she had mixed up the gifts! She felt bad about it, so she bought us a blender!

We had a good laugh about the confusion and were thrilled to have a blender! We love to have smoothies for breakfast or snacks, so our blender has been used a lot. So much in fact, that after 3.5 years of weekly use, the motor in our blender has called it quits. A few weeks ago we ordered a new one, and let me tell you, Mike thought it was Christmas again! He was so proud of our shiny blue Blender !
!
Mike is completely obsessed with Biscoff Spread . We go through at least one jar a week! Not too long ago, he suggested making a Biscoff shake. Shakes are so easy to make, I wasn't going to complain about his desire for an easy snack! We both loved these shakes, and now Mike requests them a few times a week.
I think we're going to have to buy stock in Biscoff...

Biscoff Shakes
Makes 2
Ingredients:
3 cups vanilla ice-cream
1 cup milk
1/3 cup Biscoff spread
Blend all ingredients together until smooth. Pour into glasses and serve immediately. Top with whipped cream if desired.
This post contains affiliate links.
When Mike and I got married, we thoroughly enjoyed registering for gifts. It was the first time either of us lived on our own, so we really were starting from scratch. We were completely blessed with all the gifts we received from our family and friends.
But we were slightly confused that a month after our wedding, our registry was showing that a blender had been purchased, but we couldn't find it in our house. I couldn't remember receiving a blender and it wasn't listed on any of our gift lists we made for thank you cards. We couldn't figure out if we had misplaced the blender, or if the registry was just incorrect. We decided to wait until we needed a blender to buy one.
In December, we were at a family Christmas party and Mike's aunt came up to us with a gift. She said it was a wedding present. We were married in October, and had already received a shower and wedding gift from his aunt, so we certainly weren't expecting anything! We opened up the bag and inside was a blender! It turns out that Mike's aunt had purchased the blender for us, but she attended two weddings in October. When she got our thank you card, she was confused that we thanked her for a set of glasses as she was sure she had given us something "bigger" (her words, not mine!). Then she received a thank you from the other couple, thanking her for the blender. She quickly realized that she had mixed up the gifts! She felt bad about it, so she bought us a blender!
We had a good laugh about the confusion and were thrilled to have a blender! We love to have smoothies for breakfast or snacks, so our blender has been used a lot. So much in fact, that after 3.5 years of weekly use, the motor in our blender has called it quits. A few weeks ago we ordered a new one, and let me tell you, Mike thought it was Christmas again! He was so proud of our shiny blue Blender
Mike is completely obsessed with Biscoff Spread
I think we're going to have to buy stock in Biscoff...
Biscoff Shakes
Makes 2
Ingredients:
3 cups vanilla ice-cream
1 cup milk
1/3 cup Biscoff spread
Blend all ingredients together until smooth. Pour into glasses and serve immediately. Top with whipped cream if desired.
This post contains affiliate links.
Wednesday, March 05, 2014
Biscoff Sugar Cookie Bars
A simple sugar cookie base, topped with cookie butter and chocolate. This sweet treat is sure to be a favorite snack!
 Mike and I are part of a small group at our church. There are two other couples in our group and we meet about every other week. When we meet, the host prepares dinner and the other two couples provide a salad or a dessert. I typically volunteer to bring the dessert because it's one of my favorite things to make. I like to try new things with our small group, and I also appreciate having other people eat the desserts so I don't have a whole pan of sweets tempting me at home!
Last week I was searching through my Pinterest account, trying to find a dessert to make. I wanted something pretty easy since Friday was busy and I didn't have a lot of time to make a dessert. When I came across the Biscoff Sugar Cookie Bars, I stopped searching. Mike is still obsessed with Biscoff Spread, so I had a feeling this dessert would be a hit!
When I made this recipe, I apparently didn't read the directions carefully enough, so I used 2 cups of chocolate chips in my chocolate layer. While it was still delicious, I would recommend using just 1 cup because otherwise the chocolate is quite overpowering.
These bars were the perfect dessert for our small group, but I think next time I'll have to make a pan just for Mike and me!
 Biscoff Sugar Cookie Bars
Makes 1 9x13" pan, approximately 20 bars (depending how you cut them)
Ingredients:
1 Sugar Cookie Mix , plus ingredients to make it
2 sticks butter, divided
1 cup Biscoff Cookie Butter Spread
1/2 cup powdered sugar
1 cup chocolate chips
1. In a mixing bowl, prepare the sugar cookie mix according to the package directions.
2. Press sugar cookie dough into a greased 9x13" pan and bake at 350 for 20 minutes.
3. Cool the cookie bars on the counter for 10 minutes and then refrigerate for 30 minutes.
4. While the cookie bars are cooling, prepare the cookie butter layer: Soften the butter in the microwave for about 10 seconds.
5. Add in the cookie butter and microwave for 30 seconds, until melted.
6. Beat in the powdered sugar until smooth.
7. Spread the cookie butter evenly over the cooled cookie bars. Return to the fridge.
8. Melt the remaining stick of butter with the chocolate chips in a microwave safe bowl.
9. Spread the chocolate layer over the cookie butter layer. Return to fridge to cool until the chocolate is set.
10. Bring the bars to room temperature before cutting so the chocolate layer doesn't crack. Store covered at room temperature or in the fridge.
Source: Wine and Glue
This post includes affiliate links.
Last week I was searching through my Pinterest account, trying to find a dessert to make. I wanted something pretty easy since Friday was busy and I didn't have a lot of time to make a dessert. When I came across the Biscoff Sugar Cookie Bars, I stopped searching. Mike is still obsessed with Biscoff Spread
When I made this recipe, I apparently didn't read the directions carefully enough, so I used 2 cups of chocolate chips in my chocolate layer. While it was still delicious, I would recommend using just 1 cup because otherwise the chocolate is quite overpowering.
These bars were the perfect dessert for our small group, but I think next time I'll have to make a pan just for Mike and me!
Makes 1 9x13" pan, approximately 20 bars (depending how you cut them)
Ingredients:
1 Sugar Cookie Mix
2 sticks butter, divided
1 cup Biscoff Cookie Butter Spread
1/2 cup powdered sugar
1 cup chocolate chips
1. In a mixing bowl, prepare the sugar cookie mix according to the package directions.
2. Press sugar cookie dough into a greased 9x13" pan and bake at 350 for 20 minutes.
3. Cool the cookie bars on the counter for 10 minutes and then refrigerate for 30 minutes.
4. While the cookie bars are cooling, prepare the cookie butter layer: Soften the butter in the microwave for about 10 seconds.
5. Add in the cookie butter and microwave for 30 seconds, until melted.
6. Beat in the powdered sugar until smooth.
7. Spread the cookie butter evenly over the cooled cookie bars. Return to the fridge.
8. Melt the remaining stick of butter with the chocolate chips in a microwave safe bowl.
9. Spread the chocolate layer over the cookie butter layer. Return to fridge to cool until the chocolate is set.
10. Bring the bars to room temperature before cutting so the chocolate layer doesn't crack. Store covered at room temperature or in the fridge.
Source: Wine and Glue
This post includes affiliate links.
Monday, March 03, 2014
Oatmeal Raisin Whoopie Pies
I took my Healthier Oatmeal Raisin Cookies and sandwiched some sweet buttercream frosting between them. The result? A thick, sweet, and delicious whoopie pie!
 Let's take something fairly healthy and turn it into something not-so healthy, shall we?
I loved these Healthier Oatmeal Raisin Cookies that I made a couple weeks ago. I enjoyed them for snacks and even breakfast a few times. Then one day I decided they needed to be sweetened up a bit. I had some leftover frosting, so I decided to put together a few whoopie pies.
These cookies are a little thicker than your typical oatmeal creme pie cookie, so you end up with quite a massive whoopie pie. No judgment here if you pull out a fork to eat these with...I did!
 Oatmeal Raisin Whoopie Pies
Makes 10 pies
Ingredients:
20 Healthier Oatmeal Raisin Cookies
3 cups powdered sugar
1 cup butter
1 teaspoon vanilla extract
1. In the bowl of your stand mixer, combine the powdered sugar, butter, and vanilla until smooth.
2. Spread a heaping Tablespoon of frosting on the flat side of one cookie. Top with another cookie.
3. Continue frosting and assembling pies until all the cookies are used. You may have some leftover frosting.
Store pies in the fridge so the frosting doesn't melt. Bring to room temperature before serving.
I loved these Healthier Oatmeal Raisin Cookies that I made a couple weeks ago. I enjoyed them for snacks and even breakfast a few times. Then one day I decided they needed to be sweetened up a bit. I had some leftover frosting, so I decided to put together a few whoopie pies.
These cookies are a little thicker than your typical oatmeal creme pie cookie, so you end up with quite a massive whoopie pie. No judgment here if you pull out a fork to eat these with...I did!
Makes 10 pies
Ingredients:
20 Healthier Oatmeal Raisin Cookies
3 cups powdered sugar
1 cup butter
1 teaspoon vanilla extract
1. In the bowl of your stand mixer, combine the powdered sugar, butter, and vanilla until smooth.
2. Spread a heaping Tablespoon of frosting on the flat side of one cookie. Top with another cookie.
3. Continue frosting and assembling pies until all the cookies are used. You may have some leftover frosting.
Store pies in the fridge so the frosting doesn't melt. Bring to room temperature before serving.
Monday, February 17, 2014
Pizza Sticks
It's pizza, but in a stick! All the pizza flavor you love, without the mess!
 I always look forward to finding out my monthly assignment for the Secret Recipe Club. Some months I am assigned to a blog I am already familiar with, but other times I get the chance to discover a new blog. This month, I was assigned to Manuela's blog, Manu's Menu. I've heard of her blog before, but after browsing it to find recipes, I will now be a regular reader!
Manuela is an Italian, whose husband is of Indian descent, living in Australia. As you can imagine, she features a wide variety of cuisines on her blog. She specializes in Italian foods though, and I came across many intriguing recipes that I'd never heard of before like Cabbuci and Arancine. While her Italian cuisine interested me, the recipe that really caught my eye was one for Pizza Sticks. (Don't worry, I'll be trying plenty of other recipes too!)
I was looking for an easy recipe to make while Summer was napping, but I also wanted something fun that both Mike and I would enjoy. These Pizza Sticks were perfect! They have all the delicious flavors of pizza, but in a mess free and portable snack.
Manuela's original recipe gave the ingredient measurements by weight, but since that's not how I typically bake, I weighed my ingredients and then took the cup measurements. I've written my measurements in the recipe below, but you can visit her recipe for the weights. The dough was easy to work with and came together quickly. I cut my dough into sticks, but I think these would also be fun cut into squares, like Cheez-its. These sticks are best enjoyed fresh from the oven, or at least the same day they are baked. If you eat them the next day, you may want to crisp them in the oven for a few minutes firs.
Mike and I both enjoyed these sticks and Mike has already requested that I make them again!

Pizza Sticks
Makes 16-18 sticks
Ingredients:
1-1/4 cup flour
3/4 cup grated Parmesan cheese
5 Tablespoons butter, cut into pieces
1/2 cup ketchup
1 teaspoon salt
1 Tablespoon oregano
1. In the bowl of your stand mixer, combine the ingredients using the dough hook. Add additional ketchup if necessary to form a ball of dough.
2. Refrigerate dough for at least 20 minutes.
3. Place dough on a floured surface and roll into a rectangle about 10x16", dough should be about 1/4" thick.
4. Using a pizza cutter, cut the dough into 1" sticks.
4. Place sticks on a parchment lined baking sheet. Bake at 350 for 17-20 minutes, until lightly golden brown around the edges.
These are best eaten the day they are baked, but can be stored overnight in an airtight container.
Source: Manu's Menu
Manuela is an Italian, whose husband is of Indian descent, living in Australia. As you can imagine, she features a wide variety of cuisines on her blog. She specializes in Italian foods though, and I came across many intriguing recipes that I'd never heard of before like Cabbuci and Arancine. While her Italian cuisine interested me, the recipe that really caught my eye was one for Pizza Sticks. (Don't worry, I'll be trying plenty of other recipes too!)
I was looking for an easy recipe to make while Summer was napping, but I also wanted something fun that both Mike and I would enjoy. These Pizza Sticks were perfect! They have all the delicious flavors of pizza, but in a mess free and portable snack.
Manuela's original recipe gave the ingredient measurements by weight, but since that's not how I typically bake, I weighed my ingredients and then took the cup measurements. I've written my measurements in the recipe below, but you can visit her recipe for the weights. The dough was easy to work with and came together quickly. I cut my dough into sticks, but I think these would also be fun cut into squares, like Cheez-its. These sticks are best enjoyed fresh from the oven, or at least the same day they are baked. If you eat them the next day, you may want to crisp them in the oven for a few minutes firs.
Mike and I both enjoyed these sticks and Mike has already requested that I make them again!
Pizza Sticks
Makes 16-18 sticks
Ingredients:
1-1/4 cup flour
3/4 cup grated Parmesan cheese
5 Tablespoons butter, cut into pieces
1/2 cup ketchup
1 teaspoon salt
1 Tablespoon oregano
1. In the bowl of your stand mixer, combine the ingredients using the dough hook. Add additional ketchup if necessary to form a ball of dough.
2. Refrigerate dough for at least 20 minutes.
3. Place dough on a floured surface and roll into a rectangle about 10x16", dough should be about 1/4" thick.
4. Using a pizza cutter, cut the dough into 1" sticks.
4. Place sticks on a parchment lined baking sheet. Bake at 350 for 17-20 minutes, until lightly golden brown around the edges.
These are best eaten the day they are baked, but can be stored overnight in an airtight container.
Source: Manu's Menu
Monday, January 27, 2014
Game Day Recipes

One of my favorite eating days of the year is less than one week away! I'll admit, I don't really care about the football game. In fact, I couldn't even tell you who is play in this years' Superbowl. But, what I do know is that I love preparing the appetizers to eat during the game! The first year we were married, Mike and I hosted a Superbowl Party; since then we have kept it more low key and enjoyed the game with just the two of us! Mike looks forward to watching the game, and I look forward to the commercials and the food.
Today I've rounded up a list of my favorite appetizers, snacks, and desserts from what I posted in the past year. I can tell you one thing for sure, you'll be eating good this Superbowl Sunday!
 |
| Chocolate Peanut Butter Bugles |
 |
| Pepperoni Pretzels |
 |
| Bacon Appetizers |
 |
| Cosmic Brownies |
 |
| Layered Finger Jello (Team colors, anyone?!) |
 |
| Pepper Jelly Appetizer |
 |
| Pizza Sliders |
 |
| Speedy Little Devils |
 |
| Chili Dogs |
 |
| Meatball Stuffed Rolls |
 |
| Gingerbread Spread |
 |
| Mini Strawberry Cheesecakes |
 |
| Peanut Butter Oreo Popcorn |
 |
| Spicy Cheese Dip |
 |
| BBQ Chicken Nachos |
Subscribe to:
Posts (Atom)